Table of Contents
Thanks to the CSGO autoexec config file (cfg file) you no longer have to type in your custom commands or key bindings every time you start CSGO.
In fact, if you ask a veteran CSGO player to give you some great tips on making the game easier to play, most of the time they will include the importance of the CSGO autoexec.
With this in mind, you’re about to find out what exactly CSGO autoexec is, how to use it, and anything else that might be important.
What Is a CSGO Autoexec?
To put it simply, the CSGO autoexec cfg file lets you save all of your custom Counter-Strike Global Offensive settings that you’ve edited by using commands via the Developer Console.
Without your personal config file, you would have to re-activate all of your custom settings every single time you launch the game.
For example, let’s say that you have customized your CS GO video settings, crosshair settings, maybe added a few commands to boost FPS, and so on. Now imagine that you have to waste a couple of minutes doing this every time you launch CSGO.
Well, thanks to the CS:GO autoexec config files, you only have to do this once.
To avoid confusion, a CS GO autoexec file and a config file or cfg file are the same thing. It allows you to edit it, save it, and it will automatically load all your saved personal settings when you start Counter-Strike Global Offensive.
How To Create An Autoexec For CSGO?
You can create your own settings and personal commands and save them in a custom autoexec in CS GO. Also, you can edit and save this autoexec file as many times as you want.
First things first, you have to find your config folder before you get to edit the game settings. To do this, follow these steps:
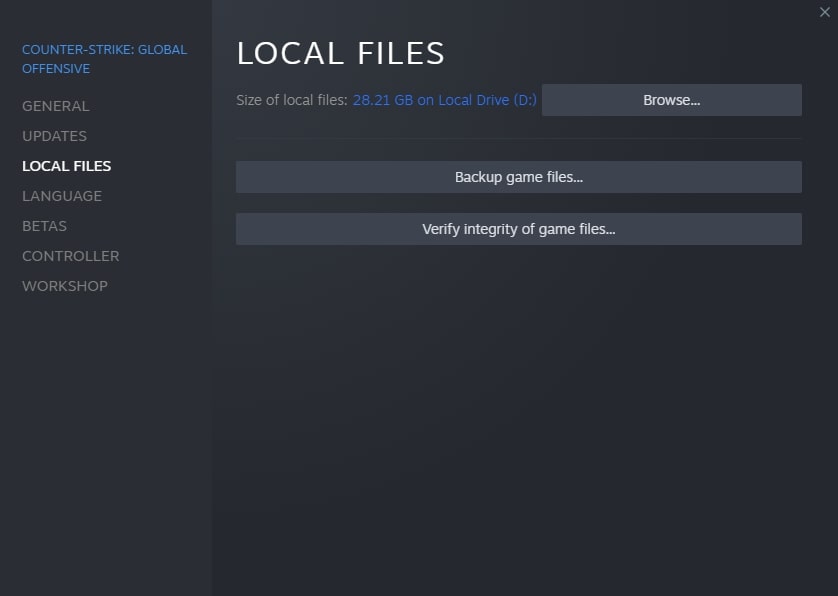
- Launch Steam > go to Steam Library > right-click on CS:GO > select Properties > click on Local Files > and then on Browse Local Files (or just Browse).
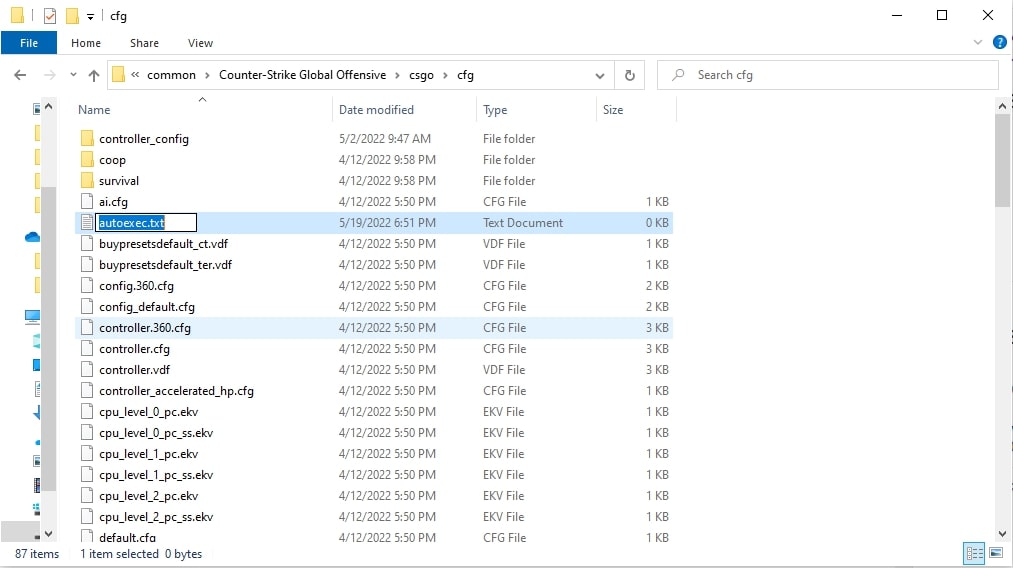
You will see a bunch of different folders in front of you. Open the one titled CSGO and then click on another folder inside this one, titled cfg.
Now, you’re in!
The next few steps are very important so try to stick to them exactly as they’re written here.
- Create a new text document inside the cfg folder > name it autoexec.txt > open this text document and insert your CSGO autoexec commands.
We’re almost there. All that’s left to do now is properly save the autoexec file and you’re done.
After you’re done typing in all of the commands in your own autoexec file, follow these steps to save it.
- Inside the text document, click on “File” > “Save As” > name it autoexec.cfg > select “All Files” under the name > click on “Save”.
Now, your new autoexec CS:GO config file is ready and it’s time to show you how to run it inside Counter-Strike Global Offensive.
How to Run Autoexec in CSGO?
There are two ways to run autoexec CSGO config files.
The first way includes loading the file with one simple command every time you launch the game. We don’t want this!
The second option includes editing your CSGO launch options once which will allow the autoexec config file to automatically load every single time.
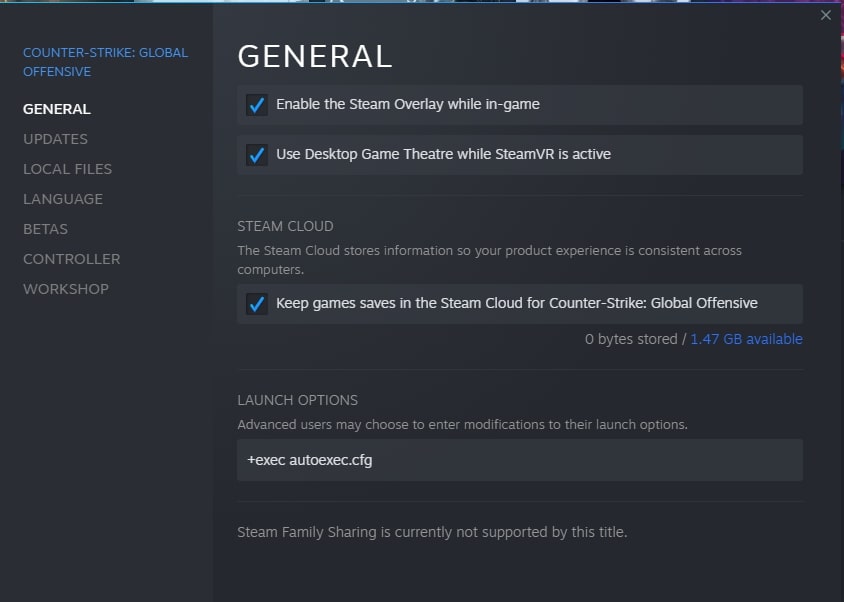
- From the Steam Library, right-click on CSGO and go to Properties
- In the General tab, click on Set Launch Options
- Enter this command: +exec autoexec.cfg
- Click OK
If you don’t do this, then you will be forced to open the console and type in exec config/ exec autoexec every time you open CSGO.
Best CSGO Autoexec Configuration
Did you know that you can actually “steal” the autoexec CSGO commands from other players. This is especially beneficial if you want to have the same config file and console commands as CSGO pro players.
Do you know what to do with the unwanted CS:GO skins from your Steam Inventor? Sell CSGO skins for Paypal in one of the best trading platforms when and where you want.
Among the best autoexec for CSGO is the following one, which countless players are using for improved gameplay.
Rates
- Rate – 128000
- CMD Rate – 128
- Update Rate – 128
- Interp – 0.0
- Interp Ratio – 1.0
- Lag Compensation – ✅
Video
- Brightness – 2.1
- Max FPS – 145
- Max FPS In Menu – 60
- Dynamic Shadows – ❌
- Draw Tracers in First Person Mode – ❌
Audio
- Volume – 0,4
- Voice Enable – ✅
- Voice Scale – 1.0
- Speaker Config – 1
- Music Volume – 0.0
- Sound Delay – 0.05
- Headphone Pan Exponent – 2
- Headphone Pan Radial Weight – 2
- Legacy Surround – ❌
- Mute Game While Alt-Tabbed – ✅
- Voice Chat in Lobby – ❌
Mouse
- Zoom Sensitivity – 1.0
- Mouse Raw Input – ✅
- Mouse Acceleration – 0.0
Radar
- Always Centered – ✅
- Rotate – ❌
- Scale – 0.38
- Icon Scale – 0.4
Misc
- Developer – ❌
- Enable Console – ✅
- Console Filtering – 2
- Disable Community Server Message – ✅
- Max Ping Allowed for MM Server – 100
- Basic Game Instructions – ❌
- Toggle Duck – ❌
- Toggle Walk – ❌
- Force Map Reload – ✅
- Disable HTML GreetingsMOTD – ✅
- Helpful Tooltips – ❌
- Show Hints – ❌
- Disable Freeze Cam – ✅
- Show Teammate Colors – ✅
- Color Font on Weapon Name Is HUD – ✅
- Automatically Switch to Better Weapon If Picked Up – ❌
- “Use”-key Opens Buy Menu – ❌
- Close Buy Meny On Every Purchase – ❌
- Take Screenshot of Scoreboard At the End of Each Game – ❌
In addition, you can also use a CSGO autoexec generator to get some ideal settings if you don’t know how to set them up yourself.
Final Verdict
As you’ve just seen, all it takes is a few tweaks here and there and you can fully edit your default config in CSGO and create completely custom autoexec files.
A few things to keep in mind when doing this:
- Remember to save the autoexec txt file as “All Files“. It won’t work otherwise.
- You must edit the CS:GO launch options as we showed above. Otherwise, the autoexec cfg CSGO file won’t affect the in-game settings on its own
- You can tweak your own personal settings in the autoexec file as many times as want
If you find the CSGO autoexec file not working, simply revert back to these tips and check if you’ve skipped a step or done something wrong.
![[EN] BLOG](https://skincashier.com/blog/wp-content/uploads/sites/9/2022/09/skincashier-logo-1-1.png)


