Table of Contents
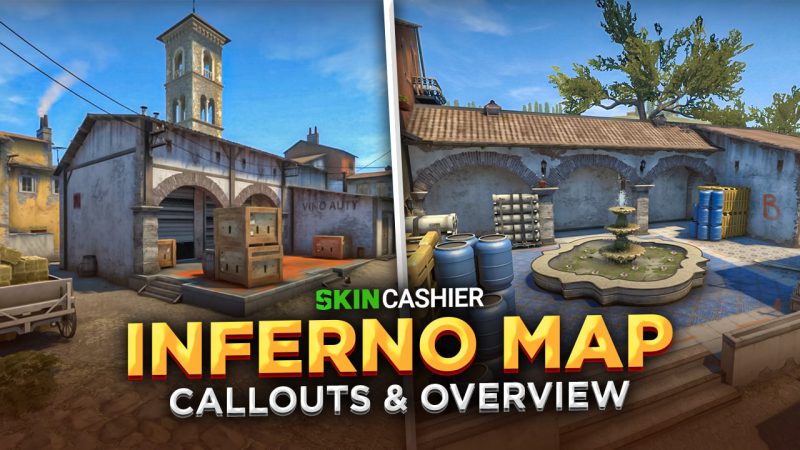
Inferno is a map in CSGO that has been around ever since Counter-Strike was released more than 20 years ago. It’s one of the oldest and most popular maps in the game that has remained relatively the same aside from a few visual and texture improvements. This guide features everything you will need to become a pro on this map and learn it like the back of your hand.
What Are CS:GO Inferno Callouts
CSGO Inferno Callouts are simple words that are meant to quickly inform a teammate about a location on the map. They are names for each location that were invented to save time when trying to call for backup or send someone to defend a certain point. Some maps, like Inferno, have more than 60 Map Callouts.
CSGO callouts for Inferno help players not waste time by describing to a teammate where to go. Learning as many as you can is crucial for boosting progress and getting better at the game.
Brief Overview of Inferno
Inferno is one of the most balanced maps in CSGO. It was created by Chris Auty and was originally designed as an abandoned residence where the battle took place during an evening setting. The map has experienced many changes, although none has been regarding the layout. A few updates widened the paths, improved graphics, changed brightness and window size, but the map layout has always been left the same.
After a few revamps, the Inferno map has turned into an Italian town where some of the fiercest and most exciting battles are taking place. Inferno has many choke points, funnels, and is often the final map in many best-of-three professional tournaments. If you’re skilled enough and know the Inferno map corner to corner, even a low economy can allow you to overrun a bombsite and secure countless wins.
Inferno Callouts
Inferno is one of the more advanced maps in CSGO that forces even professional players to carefully strategize and plan their moves. The map features 61 callouts, which is the highest number of callouts any map in CSGO includes, making it the hardest to learn and play on.
One of the main reasons for this is the great distance between the two bomb sites. On top of that, there are various routes to approach each, all of which could be potential risks for an ambush.
Inferno also features a balanced layout of structures and open areas. Because of the fact that the Terrorist spawn is located furthest away from both bomb sites and the CTs are spawned between them, it makes it quite difficult for the Terrorists to reach each site and plant the bomb.
High-ranked and skilled players know how to deal with countless possible scenarios on Inferno, taking advantage of everything the map has to offer. Read below to find out how to become a pro in Inferno and make your opponents run around in circles on the map by learning all the callouts and their features.
Bombsite A
Inferno is a CT-favored map, meaning it’s hard to play as a Terrorist on the map if you haven’t learned the crucial details about each callout and how to go around many of the obstacles.
Bombsite A is located on the right side of the map. It’s one of the most visible and open areas on Inferno, surrounded by wide corridors and providing many opportunities for an ambush. This area also features some of the best hiding spots and vantage points on the map.
The area around Bombsite A can be one of the most exciting places to fight, providing countless objects for cover. Fights can take quite a while here before finally defeating the enemy. This makes it the perfect place to buy time if you’ve planted the bomb and want to defend it.
How to Defend Bombsite A on Inferno
Even though there are great hiding spots at Bombsite A, there isn’t much space to run if you’re cornered from all sides. However, you can use this area to your advantage if you’re the only one left alive from your team. The pit and the graveyard can be excellent places to wait for the enemy and ambush them as they try to defuse the bomb.
Just remember, this area is usually attacked from two sides if the enemy wants to create a successful attack, meaning you have to get creative and catch them one by one. Taking advantage of smoke grenades and flashbangs is one of the most crucial things to remember for defending the bomb site, as well as attacking it.
How to Attack Bombsite A on Inferno
As we mentioned, the same features that allow this area to be easy to defend make it a bit more difficult to attack and take. Utilizing smoke grenades and flashbangs can also give you an advantage when attacking if you know how, where, and when to use them.
Try this: to mount a successful attack on Inferno’s bombsite A in CSGO, you will almost always want to divide the team into two and attack from both sides. One team will have to secure a vantage point from the apartments up top and the other will mount a ground attack, utilizing smoke grenades and flashbangs to push through the corridors.
After doing this, split up the team that has 3 players and leave one player to keep an eye on the Banana, making sure you don’t get flanked and ambushed from behind. If each player from the opponent’s side is already waiting there, the fifth player from your team will rush to join the fight and attempt to defend the bombsite successfully by eliminating the enemy.
One of the best practices for easily defending the bombsite A on Inferno is to win the pistol round. This will prevent the enemy from buying more powerful weapons and will give you a much-needed advantage to easily pick them off and mount a successful offense later on.
Bombsite B
Found on the opposite side of the bombsite A, this area features as many, if not more, exciting features. There are three open routes from which the enemy can come and attack the site. Each route is as risky as the other, which is why it’s important to strategize and predict what possible dangerous scenarios may occur while infiltrating the bombsite B on Inferno.
How to Defend Bombsite B on Inferno
Just as there are many attack routes for bombsite B, there are also various defensive positions one can take and secure. If you’ve played on the map, you are probably aware that most of the action when attacking takes place in the CT area. This is a route the attacking team takes to reach the bombsite. While rushing through this area, it gives you enough time to choose and secure a defensive spot.
There is a great vantage point on this bomb site as well. It’s a great idea to have one team member waiting there to provide information on where the enemy is. However, keep in mind that skilled opponents will try to take out this player first, so look over your team and yourself at the same time. Also, keep your fingers on your utility grenades such as flashbangs and smoke grenades, as sometimes throwing the enemy off balance is all you need to pick them off as they approach the bombsite.
How to Attack Bombsite B on Inferno
Attacking the B site on Inferno can be relatively easy if your team follows a plan and sticks by it no matter what. There are only a limited number of ways you can attack bombsite B. First, your team has to split up and send a few players to take control of the Banana route with a few smokes and preferably a Molotov.
Then, another set of players will take a smoke grenade and smoke out the CT area. This will block off the CT Spawn route and will leave more room for the bomb carrier to make it safely to the bombsite. This is usually when the fight will start. Your team needs to make sure to take out the defenders by predicting where they will try to ambush you after you’ve gotten closer.
Defusing the bomb for the CT team will be much harder now that your team has control over Banana with the Molotov, leaving them much more vulnerable. Make sure to keep a flashbang in your arsenal as a last resort. This will come in handy in case there’s an enemy left on a good vantage point who can take your team out quickly.
CT Spawn
The CT Spawn and the T Spawn areas are located on opposite sides of the map. The CT Spawn is significantly closer to both bombsites on Inferno, making it much easier and faster for Counter-Terrorists to get to these sites and set up a defensive perimeter.
There are various routes you can take to reach both site A and site B. For bombsite A specifically, there are two main routes you can start with. Going through the Kitchen and the Inferno Library will lead you to site A and offers the possibility to set up a quick defense. Following the square means taking the Top Mid path, ensuring a much greater chance of joining a battle early in the round.
Getting to site B from the CT Spawn means taking the path through the Well and straight to the CT zone. From there, you can rush to B and take up a vantage point or hide in the Sand Bags and wait for the enemy to come.
T Spawn
Sitting all the way across the map from the CT Spawn is the T Spawn area. This zone sits at the bottom left corner of the map and includes paths that quickly branch out into various corridors and locations on the map.
Choosing to go left once you spawn means going Mid onto a high Ledge with a clear vision of a zone of high interest for the CT team, the Top Mid area. Going right forces you under the Bridge and takes you to Second Mid. This can often be a much safer route as you will most likely have a player providing support from the top Balcony, allowing you to quickly make your way to the CT Apartments, the Window Room, or into the daring Top Mid location where a few CTs are bound to wait with loaded guns.
Going right gives you another option to branch out through the corridors. You can switch paths once you reach Bottom Mid and go left towards the Banana area, which is another location where Counter-Terrorists will want to control to prevent the Terrorists from reaching the B site.
Banana
Banana is a famous location on the Inferno map which is no more than a narrow corridor where the match can quickly be decided if you’re not careful. There aren’t many places you can hide in this area if you’re on the T side and are approaching B to plant the bomb.
There are only two small holes where you can take cover when pushing through this area. You can also take advantage of the walls to bounce a Molotov and try to land it on the Sandbags area. If you manage to reach closer to site B through here, you can expect a lot of CTs waiting for you ready to kill.
Middle
There are three branches Mid splits into on Inferno, including Bottom Mid, Top Mid, and Mid. Each of these paths has different hiding spots that can be used as an advantage to catch the enemy off guard. Because there are so many possible routes, it’s harder to guess where you are.
If you go down the Bottom Mid path, you can quickly travel to Second Mid through an Underpass by crouching. Bottom Mid can also take you to Mid, which is the most open area of the three where fights are bound to go down.
Taking the Mid or Second Mid route will get you closer to site A if you’re on the T side. However, both of these areas are open to ambushes as there are plenty of hiding spots. Top Mid, in particular, is an area the CT side doesn’t take for granted and will defend with their lives. Top Mid separates the Arch and the Short side path which both take you to site A. You need to take special care on all of these paths, regardless of which team you’re on.
Apartments
The Apartments in the Inferno CS GO map are a great way to gain access to a lot of different areas on the map. However, even though they can save time and prevent you from being out in the open, the Apartments can still be very dangerous due to lack of hiding space and narrow corridors.
There is also a window area in this location. This place serves as a great vantage point to look around the map and see if there’s any movement nearby. You can use the Apartments to go into the Living Room by crossing the Bridge, rush to Second Mid, access the A bombsite, exit through the Boiler Room, and go to Top Mid, and more.
Second Mid
Second Mid is the last, but not least, main Map Callout when it comes to Inferno. It features a similar layout as Mid but is much bigger and includes more branching paths leading to all sorts of locations. Second Mid is located just between the CT Apps and the T Apps and allows quick travel between the other Mids.
Second Mid is not as likely to be home to a battle as Mid is. This is because Second Mid is mostly used for fast travel, and players rarely meet face to face here at the same time. Nevertheless, controlling this area can be worth it for the defenders to prevent attackers from moving around too quickly.
Conclusion
What you’ve seen in this CSGO Inferno Map Callouts guide are the main Callouts every CS GO player should aim to remember and memorize thoroughly. You will be thankful for the number of times knowing each Callout will save your life and the round as well. Learning these main Callouts will allow you to learn the areas around them as well, accelerating the time it will take for you to become a master of the CSGO Inferno map.